When we moved into this house exactly five years ago, everything in it was at least 30 years old but the house had great bones and we knew we could work with it. We reno'd the kitchen, replaced all the flooring on each floor, replaced all windows and doors and then basically just painted. By the time we got around to the bathrooms, we were clean out of energy and reno funds but being that this was the main floor bathroom and the one seen by guests, it was important for me to have it at least look decent and slightly reno'd. I started out with an idea and a budget of $500 to complete the bathroom reno. Well, the idea stuck around but the budget, well, the faucet alone took the majority of that :) but I did manage to arrive pretty darn close to the budget.
This is what the bathroom looked like originally. Quite basic but also quite uniform for the genre of homes in this area built at the same time in the 70's.
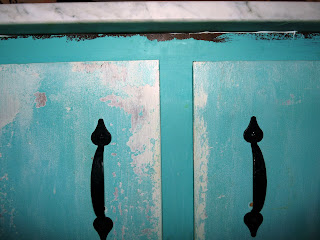
I did not want to remove the existing cabinet fearing the Pandora's Box lurking behind the removal of a cabinet which had been placed here about 30 years ago. I took the doors off, painted them, then unpainted them, and reversed the doors so that the original front facing side was now facing the inside of the cabinet. I didn't like the lined grooves but having reversed them, I was able to work with a solid, flat surface. By unpainting, I paint several different colors (usually whatever I have freshly shaken) and then once all layers are dry, I pour Mohawk Professional Paint Stripper on the areas I want to distress and within minutes, the paints bubble and loosen. A simple rag or steel wool rubs the bubbles out and the effect resembles aged paint. Super easy and super duper cheap fix.
I learned marble and granite stores usually have remnants or cast offs hanging around which they will sell for much less being that they are leftovers or to them 'unusable'. It took visiting 8 different marble manufacturers til I found one that had the correct size 'cast off' I needed for the bathroom counter. As a bonus, they even cut the sink and facet holes for free! Not sure if that would happen at every marble store but I was sure happy (I was then able to justify the cost of the faucet)!
I love exposed hardware of any kind and Lee Valley had the perfect size handles and hinges.
The tiles were super inexpensive also. I bought a box of plain white 2x2 tiles and a single sheet of black 2x2 tiles. Being that I didn't want the tiles to look uniform and consistent, we randomly replaced a white tile with a black tile. I truly wanted hexagon tiles in this bathroom but at the time, I could not find any suitable for floor tiles, just wall tiles which I was told over and over again, would crack and chip very easy when used on a floor.
So the inside of the cabinet is not so pretty but really, it still works and works well... So there you have it! A little paint, I lot of marble store shopping and presto and voila, a bathroom reno'd without a huge price tag!
We still have 2 bathrooms to completely renovate and I have been hoarding pieces for them for a while now. For certain the main bath will include and involve a tin ceiling, hexagon tiles (not compromising this time), bead board and a vintage dresser turned into a vanity. Might be a while before I finish collecting but will definitely share when it's completed.
Thanks for stoppin' by!


holy cow mama - AMAZING JOB. love love love the colour of the cabinets!!!
ReplyDeleteyou nailed it!
you HINGED IT! :)
ReplyDeletelooks amazing! should have looked at it when i was visiting!
ReplyDeleteHoly cow indeed! You just saved me tons of money my dear Rosa!
ReplyDelete